diciembre 23, 2011

NOCHE DE PAZ - HOLY NIGHT


Te deseo a ti y a tu familia una Feliz Navidad y  un
Próspero Año Nuevo 2012 lleno de mucha
Salud, Paz y Amor. Bendiciones para todos.


***********


Wishing you and your family a joyous
Christmas season and all the best for the New Year.

diciembre 19, 2011

GLITTER POINSETTIA TUTORIAL


TUTORIAL COMO HACER UNA FLOR DE NAVIDAD:

*TUTORIAL OF HOW TO MAKE A GLITTER POINSETTIA:

Con el troquelador Blosson Petal Builder (121808)
corta 16 pétalos grande y 16 pétalos pequeños. Luego,
 con el troquelador 3/4" Circle (119873) corta 2 de ellos.

***********

*With the Blosson Petal Bulider (124808) punch, cut out 16 
big petals and 16 small petals. Later, cut out two circles 
with the 3/4" Circle (119873) 

Toma los círculos 3/4" y pega 4 pétalos con silicona fría (Glue Dots). 

************

*Take the two 3/4" circles and paste 4 big petals on one of 
the circles and 4 small petals on the other one with glue dots.

Después, toma cuatro pétalos mas y pegalos entre cada pétalo.

************

*Then, take 4 petals and paste them in between 
the spaces as shown in the picture.

Con un abridor de hueco hazle en el centro de la flor un orificio
para colocarle un brads dorado. También, puedes colocarle un botón
perlas o piedras doradas. 

************

*With the hole puncher, cut a circle in the middle of the flower
to place a golden brad. You can also put 
a button, pearls, or gold rhinestones.

Luego, toma los 8 pétalos restantes y pegalos por la parte 
de atras con botones de silicon frio (Glue Dots).

*************

*After you're done with that, take the 8 petals maintaining 
and glue them on the back with glue dots.

Así lucirá la flor con los 16 pétalos.

************

*This is how the flower will look with 16 petals.


haz click en el enlace rojo para comprar el producto en linea 24/7

Ahora, con la ayuda del Big Shot y la plantilla Stocking Accents (124099)
corta 8 hojas. Después, toma la tabla que hace lineas y hazle una
 en el centro de cada hoja. Por ultimo, toma una esponja y tinta color verde y
sombrea los bordes y la linea de las hojas.  


*************

*Now, with the help of Big Shot and the Stocking Accents die (124099)
cut out 8 leaves. Take the simply scored board and make 
a line on the leaves down the middle. Lastly, take a sponge and green ink
and shadow the borders and the line of the leaves.

Pega las hojas por detrás de la flor. 
Ahora, puedes decorar lo que tu desees 
una tarjeta, una hoja de Scrapbook, una caja de chocolates, etc.  

************

*Glue the green leaves by the back part of the flower.
Now, you can decorate whatever you want with these flowers, 
either a card, a Scrapbook page, a box of chocolates, etc.

diciembre 15, 2011

NATIVITY PUNCH ART - UN PESEBRE HECHO CON TROQUELADORES


El origen de mi tarjeta fue por esta imagen que encontré por
Internet, me impresiono y gusto tanto que cuando la vi solo me imagine 
hacerla con mis troqueladores.  A continuación les daré el tutorial de
como hacer las imágenes.  


************


*The idea for my card was given to me by this picture I found on the internet.
It impressed me and I liked it so much that when I saw it, 
I only imagined doing it with my punches. Now, I will give you a tutorial
of how to make the figures.


TUTORIAL DEL PESEBRE:

*NATIVITY TUTORIAL:

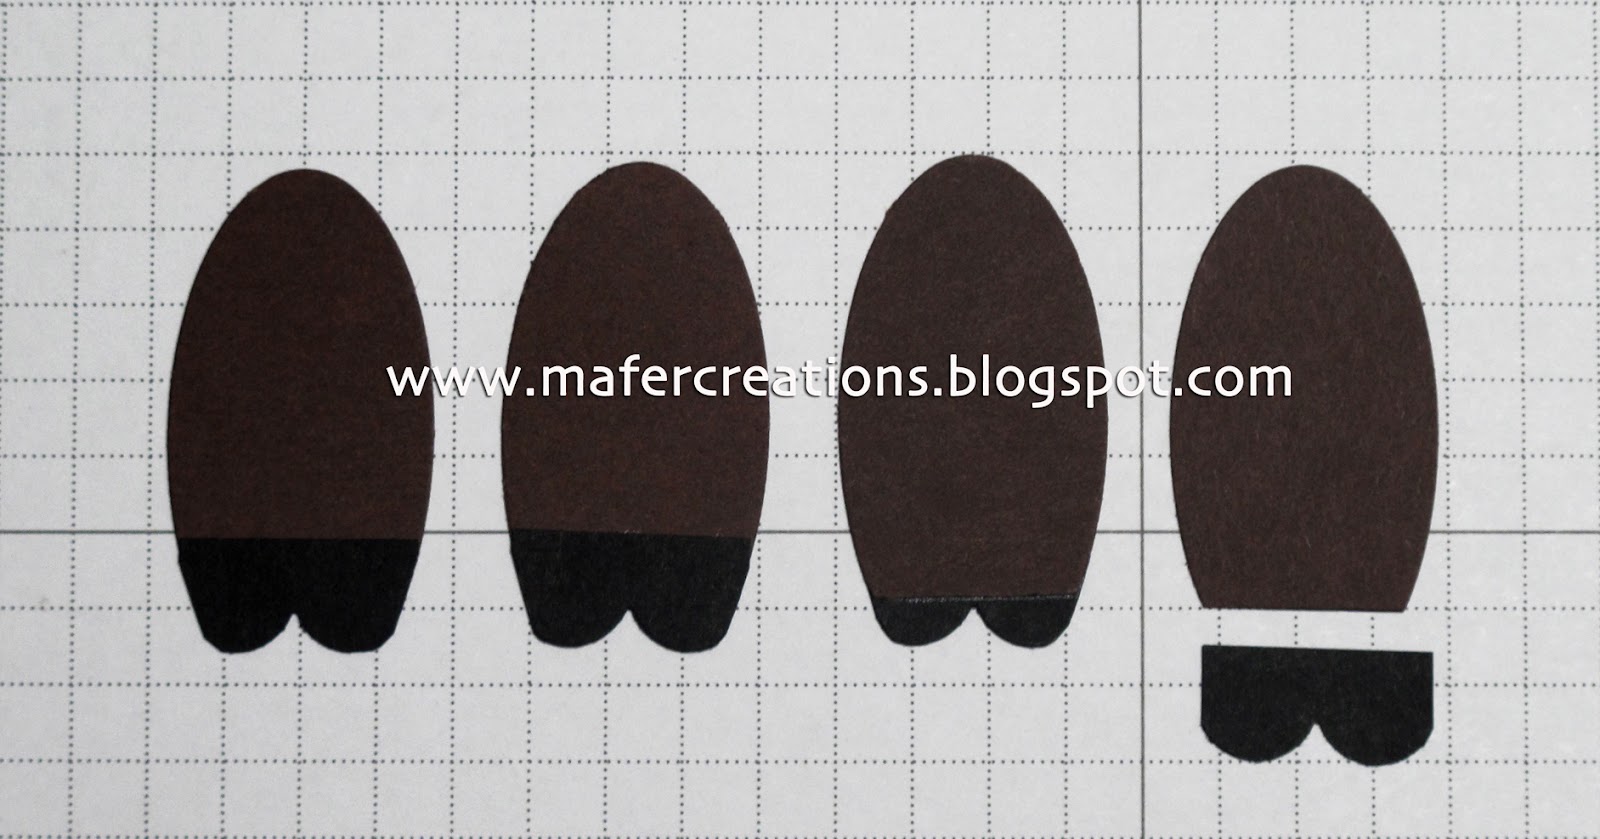
 Para hacer a Maria corta una tira celeste de 1" de ancho por
2" de largo, luego toma el troquelador ovalado Extra-Largo (119859)
e introduce la tira solo de un extremo dejando el otro fuera del troquelador,
cortalo para que te de la forma ovalada en la parte de arriba.
Después, que ya tenga cortado el ovalo, corta el otro extremo recto
dejando una medida para el vestido de 1-5/8" de largo.
Para hacer el vestido de Jose es el mismo procedimiento 
pero la tira la cortaras 1" de ancho x 3" de largo, 
haces el medio ovalo y luego, cortas  el otro extremo recto
 dejando que el vestido mida 2-1/2" de largo. 


*************


*To make Maria, cut a 1" wide x 2" long strip. Then, take the Extra-Large
(119859) punch and place it into only one extreme leaving the rest outside of the punch.
Cut it so it can give you the oval-form on the top part.
After that, cut the other extreme to make sure your figure is 1-5/8" long.
To make the dress for Jose, it is the same procedures but cut the strip 
1" wide x 3" long, make the oval shape and then cut the extremes 
to make sure it is 2-1/2" long.

Para hacer los brazos corta un ovalo en la cartulina con
el troquelador Ovalado (119855). Luego, encima de este
 introduce otra vez  el troquelador  hasta la mitad, 
corta y te saldrá el brazo como se muestra
la foto. Después, redondea uno de los extremos con la tijera.  


*************


*To make the arm, cut an oval with the Oval punch (119855).
Then, on top of this one, place the punch only until the center,
and your arm will come out as shown in the picture. 
When you're finished with that, round the arms in one of the ends
with a scissor.

Con una esponja y tinta del color de las cartulinas
sombrea los borde para darle un efecto de sombras a los vestidos.
Dobla el otro extremo de los brazos que no redondeaste
 para pegarlo por la parte de atrás del vestido y
  colocale adhesivo dimensional en la parte que va hacia el frente.


*************


*With a sponge and ink the color of the paper, shadow the borders 
to give effect to the dresses. Fold the other extreme of the arms that
you didn't round with the scissors to paste it in the back part of the dress 
and place dimensional adhesive as shown in the picture.

Pega una tira delgada color marrón en el vestido de Jose
para hacer el bastón.
  Luego, pegas los brazos como se muestra en la foto.
Para hacerle la cabeza a Maria y Jose corta dos círculos 
blancos de 1" (119868) y dos círculos color piel de 3/4" (119873).


*************


*Glue a thin, brown strip on the dress of Jose to make the stick.
Then, paste the arms like in the picture. To make the heads, 
cut out two white 1" circles (119868) and two skin
colored 3/4" circles (119873)

Para hacer al niño y su cuna, corta un circulo color piel con el
troquelador Itty Bitty (118309), un circulo color verde de 3/4"
(119873) y un circulo blanco de 1/2" (119869). Para la cuna corta
un pequeño cuadrado marrón y con el troquelador ovalado
 1-3/8"x 5/8" corta en el medio de este la mitad del ovalo.


*************


*To make the baby and its crib, cut out a skin colored circle from 
the Itty Bitty punch (119873), a green 3/4" circle (119873) and a white
1/2" circle (119869). For the crib, cut a small, brown square 
and with a 1-3/8" x 5/8" oval punch, cut in the middle of the square
half of the oval.

Arma la cabeza, pegala en el circulo verde y después
pega el niño en la cartulina marrón.


*************


*Make the head, glue it on to the green circle and then paste
the figure on the brown paper.

Corta los extremo guiandote por la parte de atrás del circulo verde 
y deja la parte de abajo recta.


*************


*On the brown paper, cut the extremes. Use the back part to guide you
on what you have to cut. Remember to leave to bottom part straight.

Para hacer al toro y el burro necesitas dos círculos de 1-1/4",
dos círculos de 3/4",  el troquelador Stocking (124095) para las orejas
 del burro y el troquelador de círculo 1" para los cuernos del toro. 
Los círculos de 1-1/4" que forman el cuerpo de los animales
 cortalos rectos en la parte de abajo para dar el efecto
que están acostados.


*************


*To make the bull and the donkey you are going to need two 
1-1/4" circles and two 3/4" circles. Your are also going to need
the Stocking (124095) punch for the ears of the donkey and the 
1"circle punch for the ears of the bull.
Make sure you cut the bottom of the 1-1/4" circles
that form the body of the animals straight, so it can 
give the effect as if they were laying down.

Para los cuernos toma la cartulina gris y corta un circulo de 1".
 Luego, introduce de nuevo el troquelador 
encima del que sacaste, como esta en la foto y cortalo.


************


*For the horns, take the gray paper and punch out the 1" circle.
Them, place the punch on top of the circle you already cut out
and cut it as it is shown in the picture.

Sombrea con una esponja y tinta del color de las cartulinas
para darle un efecto de sombra a los animales y luego los armas.


************


*Shadow the borders with a sponge and ink the color of the paper
to give it the animals effect and then glue everything together.

Después, que tienes todas las figuras armadas, corta 2 tiras marrones
de 1/2" de ancho por 3-1/2" de largo para hacer el techo de la casa
y 2 mas de 1/2" x 4" para los laterales.
Haz un fondo amarillo para colocar las imágenes,
 pega la casa primero y luego las figuras con adhesivo dimensional.  
La medida de la tarjeta es 5-1/2" x 5-1/2".


***********


*After you are done, and you have all the figures glued together, cut two 
brown 1/2" wide and 3-1/2" long strips to make the roof. Cut two more 
1/2" wide x 4" long brown strips for the walls of the house. 
Make the background yellow to place your images, 
glue the house on first and the the figures with dimensional adhesive.
The measure of the card is 5-1/2" x 5-1/2".

diciembre 12, 2011

CONTAINERS FILLED WITH CHOCOLATE DECORATED WITH CHRISTMAS PAPERS - ENVASES Y CHOCOLATES DECORADOS CON PAPELES NAVIDEÑOS


Envases simples y económicos que puedes transformarlos
en unos hermosos obsequios para estas navidades 2011.
Ellos están decorados con papeles navideños, botones,
 cinta, imágenes estampadas y otras sacadas con el Big Shot . 
Los chocolates que utilice son los Hershey's Nuggets
 y están forrados con papeles decorativos con una medida
 1-1/4" x 3-1/4".
Espero que mi idea te allá servido de ayuda.


************


Simple, economic containers that can be transformed in beautiful
gifts for the 2011 Holidays. They are decorated with Christmas paper,
buttons, ribbon, and figures cut out from Big Shot, stamps or punches.
The chocolates placed inside this container are Hershey's Nuggets
and are wrapped with decorative paper with the measures of
1-1/4" x 3-1/4"
Hopefully my idea was useful to you!

diciembre 07, 2011

SANTA MAIL - EL BUZON DE SANTA


 Una simple caja de mudanza transformada en un hermoso buzón
para el  Renaissance Elementary Charter School.
Un trabajo que realice con mucho amor para que los niños
tuvieran donde depositar sus cartas para Santa.

CREE es el mensaje del buzón 
ya que la magia de la navidad es eso creer. 


*************

A simple moving box transformed into a beautiful mail box
for Renaissance Elementary Charter School.
A creation I enjoyed doing so that the children had a place 
to put their letters in for Santa.

BELIEVE is the message on the mail box
since the magic of christmas is that, believing.


diciembre 05, 2011

GLITTER SANTA PUNCH ART


Papá NoelSanta ClausSan Nicolás,
son algunos nombres con los cuales se conoce universalmente 
al personaje legendario que le trae regalos a los niños por Navidad.
En esta ocasión quise compartir con ustedes esta idea de hacer a
Santa con papeles escarchados o brillo.


*************

Santa Claus, Noel, and Saint Nicolas
are some of names that are know world-wide for the legendary
character that brings toys to kids on Christmas. 
In this occasion, I wanted to share with you this idea to make 
a Santa using papers with glitter.

TROQUELADORES  PARA HACER A SANTA:
* PUNCHES USED TO MAKE SANTA:
Gorro - *Hat: 1-1/4" Circle (119861), 1/2" Circle (119869) and Word Window (119857)
Rostro - *Face: 1-1/4" Circle (119861)
Ojos - *Eyes: Cupcake Builder (121807)
Barba - *Beard: 1-3/4" Scallop Circle (119854) and 1-1/4" Circle (119861)
Bigote - *Moustache: Curly Label (119851) 
Nariz - *Noise: Itty Bitty Shapes Punch Pack (118309)
Cuerpo - *Body: 2-1/2" Circle (120906)
Brazos - *Arms: Large Oval (119855)
Manos - *Hands: Heart to Heart (119881)
Zapatos - *Shoes: Ornament (119847) and Large Oval (119855)   
Botones - *Buttons: Cupcake Builder (121807)

noviembre 28, 2011

RUDOLPH THE RED NOSED REINDEER - RUDOLPH EL RENO DE LA NARIZ ROJA


Siguiendo con la magia de la Navidad ahora les presento 
a Rudolph, un ayudante muy especial para la entrega de los regalos.

***********

Continuing with the magic of Christmas, I present to you Rudolph,
Santa's special helper!


TROQUELADORES QUE NECESITAS PARA HACER A RUDOLPH:
  
*PUNCHES THAT YOU WILL NEED TO MAKE RUDOLPH:


Cuerpo - *Body: Die Circles # 2  (121811)

Cabeza - *Head: Ornament (119847)

Patas - *Legs: Large Oval (119855) and Scallop Edge Border (118402)

Orejas - *Ears: Blossom Petals Builder (121808)

Ojos - *Eyes: Herat to Heart (119881)

Nariz - *Nose: Itty Bitty Shapes (118309)

Sombrero - *Hat: one square 1" x 1", Word Window (119857) and Boho Blossoms (119858)

Hocico - *Snout: Small Oval (120908)

HAZ CLICK EN EL ENLACE ROJO


TUTORIAL:

 Corta dos pétalos del Scallop Edge para colocarlos
en el borde cortado del Ovalo Largo. Después cortale los lados
a los pétalos para darle la forma de las pezuñas.   


**********


*Cut two petals of the Scallop Edge Borde to place them on the cut end
from the Large Oval. Cut the borders, as shown in the picture
 to give shape to the hoof.

 Toma el Ornament y cortale la punta. Después, toma los corazones
y cortalos diagonal para hacer los ojos. A continuación pega los
dos círculos que forman el cuerpo.


***********


*Take the Ornament and cut the tip. Then, take the hearts and cut them
diagonally to make the eyes. Afterwards, take both circles and put them
together to form the body.
   
Pega los mini Ovalos negros sobre los blancos para hacer los ojos. 
El circulo rojo que sacaste del troquelador Itti Bitty 
pegalo sobre el Ovalo pequeño. 


***********


*Paste the mini black Ovals on top of the the white ones to make the eyes
as shown in the picture. 
Glue the red circle that you cut out of the Itti Bitty 
over the small Oval.

Para las orejas pega el pétalo pequeño sobre el grande que sacaste
del troquelador Blossom Petal Builder y los pegas por detrás de la cabeza.


***********


*For the ears, glue the small petals on top of the big ones that 
you cut out from the Blossom Petal Builder and paste them behind 
the head.

 Primero, pega las patas traseras y a las dos delanteras
 colocale adhesivo dimensional.


***********


*First paste the back legs, and glue the front
 legs with dimensional adhesive.

Para el sombrero corta un cuadro 1' X 1" y le colocas una
tira verde. Luego, coloca en el borde verde el Word Window. Para 
finalizar coloca ahdesivo dimensional en la flor y la pegas.    


************


*For the hat, cut a 1' x 1" and put a green strip at one extreme.
On the border of the green strip paste the Word Window. 
To finish, put dimensional adhesive on the flower, and glue it.

Rudolph esta listo para decorar la tarjeta.

***********

*Rudolph is ready to decorate your card!

noviembre 22, 2011

ELF SHOES - ZAPATOS DE UN DUENDE


La magia de la Navidad realizada en una tarjeta .

*The magic of Christmas shown in a card.


COMO HACER LOS ZAPATOS DE UN DUENDE:
Idea tomada de la diseñadora Patti Lee.  

*********

* HOW TO MAKE AN ELF SHOES:
Idea taken by designer Patti Lee.

 Toma la plantilla Top Note y con la ayuda del Big Shot cortala.
Luego, corta horizontalmente por la mitad y después en vertical,
así como te muestra la foto.

***********

*Take the Top Note Big Die and with the help of the Big Shot
cut it. Then, cut it through the middle horizontally and then
vertically as shown in the picture. 

Toma el troquelador Ornament y corta dos de ellos.
Luego, toma el Troquelador 3/4" Circle y corta  dos también.
Después, pega solo la mitad de cada figura en la parte de
arriba de las dos piezas que sacaste del Top Note.

**********

*Take the Ornament punch, and punch out two of those.
After, take the 3/4" Circle punch, and cut another two out.
Then, paste only half of the figures on the top part of the
pieces that you got out of the Top Note.

 Ahora, toma el troquelador 3/4" Circle y cuadralo con el
circulo que pegaste en la pieza roja y cortalo.

**********

*Now, take the 3/4" Circle punch and place it on top
of the circle you put on the red piece and punch it out.

 Toma el troquelador Ornament, cuadralo también con la pieza
que pegaste y cortalo.

**********

*Take the Ornament punch, and place it on top of
the piece you already had, and punch it out. 

Así te quedaran los zapatos de los duendes de Santa.
Las medias o piernas cortalas en 5/8" de ancho.

**********

* This is how Santa's elf shoes will look like at the end.
Cut the legs at a 5/8"width.